
Skip Hovsmith
- Senior Consultant at Approov
Developer and Evangelist - Software Performance and API Security - Linux and Android Client and Microservice Platforms

This article and code were written for Approov 1. Though the concepts are equally valid for Approov 2, some code examples may need updating for Approov 2. For Approov 2 please find here the relevant Quick Start for your mobile platform and http stack. If you don't find one, please refer to the Getting Started with Approov guide or into the guide for migrating from Approov 1 to Approov 2.
My company, CriticalBlue, provides a remote mobile app authentication service called Approov. An Approov SDK is provided as a drop-in library to native iOS and Android app developers to improve mobile security.
With many of our customers using or experimenting with React Native, I wanted to provide a convenient Javascript module which exposes the native Approov SDK functionality to React Native developers.
Overall, creating my first React Native native module was surprisingly straightforward. All code for my initial proof of concept is available in a github repository.
For react Native, Facebook provides a solid getting started guide which goes over the basics, including how to set up an application and how the underlying UI components differ from the usual React web elements.

from React Made Native Easy
Architecturally, there are two important threads running in each React Native application — one a main UI thread and the other running a Javascript VM. The two threads interact through a bridge whose communication is asynchronous, serialized, and batched, decoupling the two systems as much as possible.
While the bulk of the React Native app is described in React and runs on the Javascript VM, the UI is rendered using the native platform’s UI elements, and actions which alter the app’s UI are passed as messages through the bridge from the VM to the app’s main UI thread.
System functionality and libraries developed for the native device environment can be exposed to the Javascript VM using React Native’s native module interface and accessed through the React Native bridge.
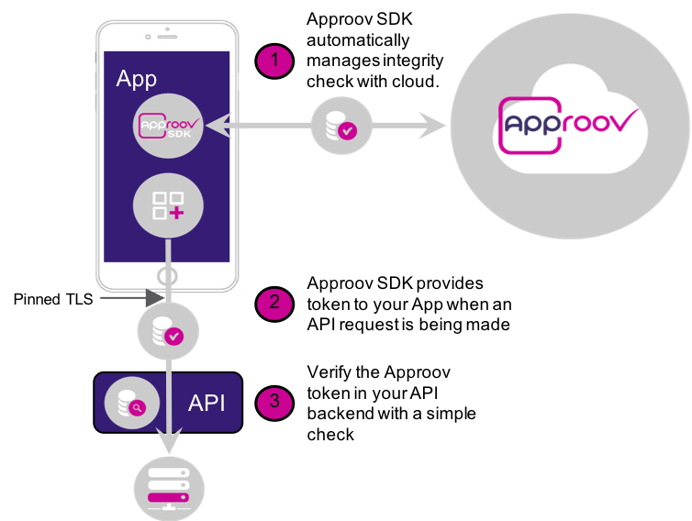
The Approov SDK is a drop-in native iOS or Android library. It interfaces with the cloud-based Approov authentication service which validates that the app is genuine, untampered, and not a bot. An app integrity token is returned from the authentication service, and that token is sent with each API call to ensure that the back-end API service is dealing with a known and genuine front-end request.
The basic operation we will expose in our native module proof of concept is fetchApproovToken(), an asynchronous operation in the native SDK.
Approov-protected API call
Before each back-end API call requiring app authentication, the client app makes a fetch token request. If a fresh token is needed, the SDK makes a remote attestation request, and the attestation service cryptographically authenticates the app and responds with an app integrity token.
The token has a short lifetime and is signed by a secret known only to the Approov service and the app’s back-end service. No secret is stored in the app, and in fact the app does not know whether the returned token is valid or not. The app simply adds the integrity token to the back-end API call, and the back-end server validates that the token has not expired and is properly signed before processing the request.
Approov offers a live demo which provides demonstration iOS and Android SDKs and a back-end service with two endpoints:
We’ll use the Android SDK with the back-end service to demonstrate a simple React Native app using Approov. A version of this example using the iOS SDK with React native is also available.
I started my React Native project using create-react-native-app (CRNA). Follow the CRNA installation instructions to setup your React Native environment and then:
$ create-react-native-app rndemo
I will be adding native code to the app, so go ahead and eject now from create-react-native-app:
$ cd rndemo
$ yarn eject
...

Ejecting is permanent! Please be careful with your selection.

? How would you like to eject from create-react-native-app? React Native: I’d like a regular React Native project.
We have a couple of questions to ask you about how you’d like to name your app:
? What should your app appear as on a user’s home screen? RN Demo
? What should your Android Studio and Xcode projects be called? rndemo

Wrote to app.json, please update it manually in the future.
Generating the iOS folder.
Generating the Android folder.
...
Select a regular React Native project and name it as you wish. The iOS and Android projects are generated, and you will need Xcode and/or Android Studio build environments installed. Native code will be added to the native Android project later on.
We will experiment with a very simple proof of concept app that will use the demo server hello endpoint to validate our network connectivity.
React Native implements the fetch API for networking. We combine the connection check, UI rendering, and styling all in theApp.jsfile:
| import React from 'react'; | |
| import { View, Image, Text, Button, StyleSheet } from 'react-native'; | |
| import ShapeView from './ShapeView' | |
| export default class App extends React.Component { | |
| constructor(props) { | |
| super(props); | |
| this.state = {shape: 'logo', | |
| status: ''}; | |
| } | |
| // check connection | |
| checkConnection = () => { | |
| fetch('https://demo-server.approovr.io/hello', { | |
| method: 'GET', | |
| }) | |
| .then((response) => response.text()) | |
| .then((text) => { | |
| this.setState(previousState => { | |
| return { shape: 'hello', status: 'connected' }; | |
| }) | |
| }) | |
| .catch((error) => { | |
| this.setState(previousState => { | |
| return { shape: 'confused', status: 'not connected' }; | |
| }) | |
| }); | |
| } | |
| // render the app screen | |
| render() { | |
| let pic = { | |
| uri: 'https://approov.io/images/approov_largelogo.png' | |
| }; | |
| return ( | |
| <View style={styles.container}> | |
| <View style={styles.header}> | |
| <Text style=>Approov Shapes</Text> | |
| </View> | |
| <ShapeView style={styles.content} shape={this.state.shape} status={this.state.status}/> | |
| <View style={styles.footer}> | |
| <View style={styles.buttonBar}> | |
| <Button onPress={this.checkConnection} title="Test Hello" /> | |
| </View> | |
| </View> | |
| </View> | |
| ); | |
| } | |
| } | |
| // flexbox styles | |
| const styles = StyleSheet.create({ | |
| container: { | |
| flex: 1, | |
| flexDirection: 'column', | |
| backgroundColor: '#fff', | |
| margin: 10, | |
| }, | |
| header: { | |
| flex: .1, | |
| flexDirection: 'row', | |
| justifyContent: 'center', | |
| }, | |
| content: { | |
| flex: .8, | |
| flexDirection: 'column', | |
| justifyContent: 'center', | |
| alignItems: 'center', | |
| }, | |
| footer: { | |
| flex: .1, | |
| flexDirection: 'row', | |
| justifyContent: 'center', | |
| }, | |
| buttonBar: { | |
| flex: 1, | |
| flexDirection: 'row', | |
| alignItems: 'flex-end', | |
| justifyContent: 'space-around', | |
| }, | |
| }); | |
| // end of file |
The top-level App component is registered in the index.js file.
The main view is rendered by a stateless view component which displays a choice of image and a status message:
| import React from "react"; | |
| import { View, Image, Text, StyleSheet } from "react-native"; | |
| const shapeView = (props) => { | |
| const imgSrc = { | |
| 'logo': require('./assets/approov_largelogo.png'), | |
| 'hello': require('./assets/hello.png'), | |
| 'confused': require('./assets/confused.png'), | |
| 'Rectangle': require('./assets/rectangle.png'), | |
| 'Square': require('./assets/square.png'), | |
| 'Triangle': require('./assets/triangle.png'), | |
| 'Circle': require('./assets/circle.png') | |
| }; | |
| return ( | |
| <View style={props.style}> | |
| <Image source={imgSrc[props.shape]} style={styles.shapeImg} /> | |
| <Text style=>{props.status}</Text> | |
| </View> | |
| ); | |
| } | |
| const styles = StyleSheet.create({ | |
| shapeImg: { | |
| resizeMode: 'contain', | |
| height: 256, | |
| width: 256 | |
| } | |
| }); | |
| export default shapeView; | |
| // end of file |
I am using Android for these examples, but this works similarly on iOS. Fire up an Android emulator (you may need to launch Android Studio for this) or connect a phone via adb. In the rndemo directory, launch the app:
$ cd rndemo
$ yarn run android
You should see a screen like this:
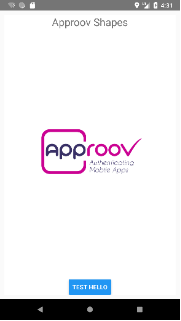
Push the TEST HELLO button and you should see a connected message if everything went okay:
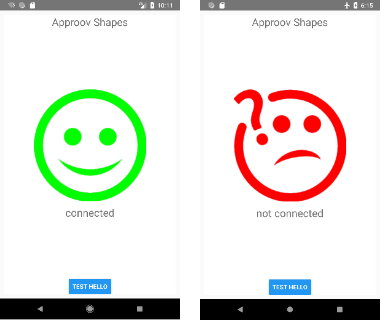
This validates network communication between our React Native app and the demo server. You can set airplane mode on your phone or emulator and push the test button again to verify there is then no longer a connection.
The Approov demo package includes a README, the iOS and Android Approov demo libraries, sample clients, and app registration tools. Download the demo package, and save the app registration token which is included in your download email.
The Approov SDK includes the native code we want to expose to React Native. It must be included in the iOS or Android native projects which were generated when we ejected the create-react-native-app. For Android, this project is located at rndemo/android. Import the Approov SDK into the Android project by following these instructions from the Approov docs.
An Android native module is described in Java by extending the ReactContextBaseJavaModule class. The getName() method must be implemented and provides the name of the module to Javascript.
Methods exposed to React Native are adorned with @ReactMethod and may provide Javascript callback or promise mechanisms. We’ll use promises in our example. Facebook’s native module page describes other capabilities such as sending events to Javascript and listening to lifecycle events.
We initialize the default configuration for Approov authentication in the native module constructor, and define ‘Approov’ in the getName()call.
The exposed fetchApproovToken() call wraps the asynchronous native fetchApproovToken() and settles a promise when the token fetch completes.
| package com.criticalblue.approov; | |
| import ... | |
| import com.criticalblue.attestationlibrary.ApproovAttestation; | |
| import com.criticalblue.attestationlibrary.ApproovConfig; | |
| import com.criticalblue.attestationlibrary.TokenInterface; | |
| class ApproovModule extends ReactContextBaseJavaModule { | |
| private static final String E_APPROOV_ERROR = "E_APPROOV_ERROR"; | |
| private Context context; | |
| public ApproovModule(ReactApplicationContext reactContext) { | |
| super(reactContext); | |
| this.context = reactContext; | |
| try { | |
| ApproovConfig config = ApproovConfig.getDefaultConfig(reactContext); | |
| ApproovAttestation.initialize(config); | |
| } catch (IllegalArgumentException ex) { | |
| } catch (MalformedURLException ex) { | |
| } | |
| } | |
| @Override | |
| public String getName() { | |
| return "Approov"; | |
| } | |
| @ReactMethod | |
| public void fetchApproovToken(final String url, final Promise promise) { | |
| ApproovAttestation.shared().fetchApproovToken(new TokenInterface() { | |
| @Override | |
| public void approovTokenFetchResult(ApproovResults results) { | |
| if (results.getResult() == ApproovAttestation.AttestationResult.SUCCESS) | |
| promise.resolve(results.getToken()); | |
| else | |
| promise.reject(E_APPROOV_ERROR, "Failed to fetch Approov Token"); | |
| } | |
| }, url); | |
| } | |
| } |
A ReactPackage bundles and creates one or more native modules:
| package com.criticalblue.approov; | |
| import ... | |
| public class ApproovPackage implements ReactPackage { | |
| @Override | |
| public List<ViewManager> createViewManagers(ReactApplicationContext reactContext) { | |
| return Collections.emptyList(); | |
| } | |
| @Override | |
| public List<NativeModule> createNativeModules(ReactApplicationContext reactContext) { | |
| List<NativeModule> modules = new ArrayList<>(); | |
| modules.add(new ApproovModule(reactContext)); | |
| return modules; | |
| } | |
| } |
The project’s main application implements ReactApplication and creates and returns a list of module packages. We add the Approov package to the list in getPackages().
| package com.rndemo; | |
| import ... | |
| import com.criticalblue.approov.ApproovPackage; | |
| public class MainApplication extends Application implements ReactApplication { | |
| private final ReactNativeHost mReactNativeHost = new ReactNativeHost(this) { | |
| @Override | |
| public boolean getUseDeveloperSupport() { | |
| return BuildConfig.DEBUG; | |
| } | |
| @Override | |
| protected List<ReactPackage> getPackages() { | |
| return Arrays.<ReactPackage>asList( | |
| new MainReactPackage(), | |
| new ApproovPackage() | |
| ); | |
| } | |
| @Override | |
| protected String getJSMainModuleName() { | |
| return "index"; | |
| } | |
| }; | |
| @Override | |
| public ReactNativeHost getReactNativeHost() { | |
| return mReactNativeHost; | |
| } | |
| @Override | |
| public void onCreate() { | |
| super.onCreate(); | |
| SoLoader.init(this, /* native exopackage */ false); | |
| } | |
| } |
On the Javascript side, the Approov native module will now be included in the NativeModules imported from react-native. In our implementation, Approov.fetchApproovToken() returns a normal javascript promise:
| import {NativeModules} from 'react-native'; | |
| NativeModules.Approov.fetchApproovToken(input) | |
| .then(token => { | |
| // do something useful... | |
| }) | |
| .catch((error) => { | |
| throw error; | |
| }); |
Bridging the native and Javascript environments was surprisingly straightforward.
Many networking libraries, such as Axios and OkHttp, include the concept of an interceptor. Interceptors can be used to intercept network requests and responses and inject some additional processing.
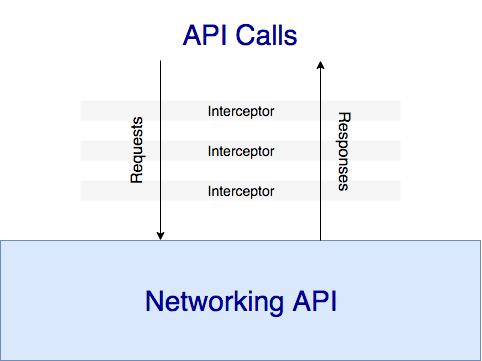
When implementing natively with the Android SDK, most customers use interceptors to fetch an Approov token and add it to each API request’s headers, so we’ll want to fully implement this abstraction in our production module. For this simple example though, we’ll hardwire the interception in a fetchWithToken() call.
In the fetchWithToken() method, when the native fetch token call completes, if the promise is resolved, we add the token to the input request headers and make a fetch() call with the augmented input request. When completed, the fetch returns a resolved promise holding the API server’s response.
| import {NativeModules} from 'react-native'; | |
| const fetchWithToken = (input, options) => { | |
| return NativeModules.Approov.fetchApproovToken(input) | |
| .then(token => { | |
| let optionsA = (options? {...options, headers:{ ...options.headers}}:{headers: {}}); | |
| optionsA.headers['Approov-Token'] = token; | |
| return fetch(input, optionsA) | |
| .then((response) => { | |
| if (response.ok) { | |
| return response; | |
| } | |
| else { | |
| throw new Error('HTTP response status is ' + response.status); | |
| } | |
| }) | |
| .catch((error) => { | |
| throw error; | |
| }) | |
| }) | |
| .catch((error) => { | |
| throw error; | |
| }) | |
| }; | |
| const Approov = Object.assign({ fetch: fetchWithToken }, NativeModules.Approov); | |
| export default Approov; |
For convenience, we create an Approov object from the NativeModules.Approov object, adding a fetch() method which is actually the fetchWithToken() method, and then we export this as the Approov module.
Now we are ready to use the Approov object for authentication. We add a getShape() method inside our App which makes an Approov.fetch(request) call to authenticate and request a random shape value. Once the fetch completes, the App component state updates, triggering a render() call which causes the ShapeView to display an updated shape and status message.
A GET SHAPES button is added to the button bar to request new shapes.
| import Approov from './Approov'; | |
| class App extends React.Component { | |
| // unchanged code ommitted for brevity... | |
| // get shape | |
| getShape = () => { | |
| Approov.fetch('https://demo-server.approovr.io/shapes', { | |
| method: 'GET', | |
| }) | |
| .then((response) => { | |
| if (!response.ok) { | |
| throw new Error('HTTP response status not OK.'); | |
| } | |
| return response.text(); | |
| }) | |
| .then((text) => { | |
| this.setState(previousState => { | |
| return { shape: text, status: '' }; | |
| }) | |
| }) | |
| .catch((error) => { | |
| const message = '' + error.message; | |
| this.setState(previousState => { | |
| return { shape: 'confused', status: message }; | |
| }) | |
| }); | |
| } | |
| // render the app screen | |
| render() { | |
| let pic = { | |
| uri: 'https://approov.io/images/approov_largelogo.png' | |
| }; | |
| return ( | |
| <View style={styles.container}> | |
| <View style={styles.header}> | |
| <Text style=>Approov Shapes</Text> | |
| </View> | |
| <ShapeView style={styles.content} shape={this.state.shape} status={this.state.status}/> | |
| <View style={styles.footer}> | |
| <View style={styles.buttonBar}> | |
| <Button onPress={this.checkConnection} title="Test Hello" /> | |
| <Button onPress={this.getShape} title="Get Shape" /> | |
| </View> | |
| </View> | |
| </View> | |
| ); | |
| } | |
| } |
Everything looks good, but when we request a new shape, we see a failure with a 400 status code, suggesting there is a problem with the client request.

Failure to fetch a shape
The call fails because the integrity token added by Approov is invalid. Until our example app is properly registered with the Approov service, the fetchWithToken() call will always fail the authentication check.
Command line registration tools are included in the demo download. To register the app, issue a registration request specifying the App’s APK bundle and the app registration token you saved from the demo download email. As a courtesy to other demo users, set your registration to expire after a few hours using the -e flag:
$ cd <<approov-demo-package>>/registration-tools/Android/Mac/
$ ./registration
   -a <<rndemo-project>>/android/app/build/outputs/apk/app-debug.apk
   -t <registration-token>
   -e 2h

Submitting data…
Success: new app signature added to database.always be done.
Once the app is registered and can be properly authenticated, pressing the GET SHAPES button should return one of these shapes:
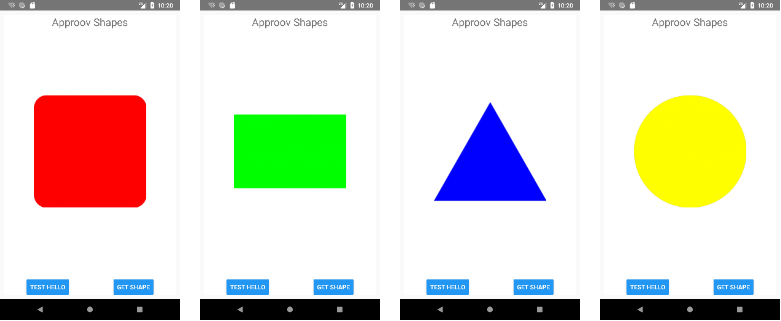
Successfully fetching random shapes
The security of the communication channel is very important during API calls. If the channel is insecure, an API call could be intercepted and modified. An integrity token, although it has a short lifetime, could be observed in the insecure channel and used to make malicious API calls with impunity.
Despite using HTTPS/TLS when making API requests, an attacker who controls both the network and the mobile device can easily setup a Man in the Middle (MitM) attack to steal and quickly reuse Approov tokens before they expire.
To counter MitM attacks, mobile clients should use certificate or public key ‘pinning’ which checks that the certificate or public key presented by the back-end service is known specifically by the client app. Other certificates, though they might appear authentic, will be rejected by the client, and no API calls will be made.
Implementing pinning in React Native is a bit complicated and will be described in a separate article and integrated into this example’s code repository.
We’ve demonstrated a native module implementation in React Native with a hardwired interceptor successfully providing app authentication and API protection.
A production quality native module implementation for React Native would generalize the interceptor functionality, add convenience configuration methods, and provide full MitM protection. For comparison, a similar Approov plugin library already exists for Cordova andIonic hybrid apps.
All code for this example is located on github.

- Senior Consultant at Approov
Developer and Evangelist - Software Performance and API Security - Linux and Android Client and Microservice Platforms