

Skip Hovsmith
- Senior Consultant at Approov
Developer and Evangelist - Software Performance and API Security - Linux and Android Client and Microservice Platforms
Editor's note: This post was originally published in October 2017 and has been revamped and updated for accuracy and comprehensiveness. The latest update was in October 2022.
OAuth2, often combined with OpenID-Connect, is a popular authorization framework that enables applications to protect resources from unauthorized access. It delegates user authentication to an authorization service, which then authorizes third-party applications to access the protected resources on the user’s behalf. OAuth 2 provides authorization flows for both web and mobile applications.
AppAuth is an open source SDK for native Android and iOS apps which implements best-practice OAuth2 and OpenID-Connect specifications in a platform friendly manner.
A sample app, implemented in Android, provides a concrete example using AppAuth to authorize access to private resources. The Books App uses the Google Books API and Google Sign-In services to search for books (protected by API key) and show a signed-in user’s favorite book selections (protected by OAuth2). The open source project is available at github.com/approov.
In OAuth2 Authorization Grant flows, resource authorization is separated from resource access. Only the authorization server needs to handle user credentials, so those user credentials are never exposed to the client or the resource server.
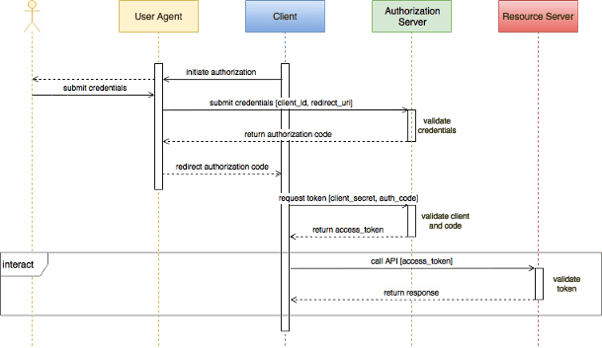
An authorization starts when a client sends a user, termed the resource owner, through redirection, to the authorization server’s website. The local user-agent, usually a browser, obtains and submits the user’s credentials and asks the user to grant permissions. The authorization server validates the credentials and redirects the access token through the user agent and back to the client.
In the Authorization Code Grant flow, authorization is split into two steps. In the first step, if the authorization server authenticates the user credentials, an authorization code is returned to the client. The client calls back to the authorization server with the authorization code and some form of client authentication, usually a client secret. If the client is authenticated, the authorization server returns an access token and optional refresh tokens directly to the client. By separating the authorization process into two steps, the access token does not flow through the user agent.
Access tokens passed from client to resource server can be verified by the resource server using the same secret used to sign them. Both authorization and resource servers share this secret, but this secret is never exposed to the client or user agent. Access tokens have a limited lifetime, so refresh tokens can be used to request fresh access tokens.
To go a little deeper on mobile security, see Mobile API Security Techniques, Part 2: API Tokens, Oauth2, and Disappearing Secrets.
The authorization code grant flow is common for web and mobile clients. A difference between web and mobile flows often shows up during the code exchange step.
Before the authorization server exchanges the code for an access token, it is important that the authorization server ensures that the client is who it claims to be. This is usually done for a web client using HTTP basic authentication with client ID and secret held on the application server.
On a mobile client, that same client secret would be statically held in the native app. Static client secrets are often easy to extract from your apps which allows others to impersonate your app and steal user data. Unfortunately, on mobile clients, it is common to exchange the authorization code for an access token using only the publicly available client ID. Which is better - authenticating using an easily stolen secret or authenticating with no secret at all?
The authorization code is returned to the mobile client by redirection through the user agent. When initially registering the mobile app with the authorization service, the developer may restrict the redirect URLs the authorization service will accept. This helps prevent a malicious actor from redirecting the authorization code to an unrelated URL address.
With no secret required during code exchange, anyone who can intercept an authorization code can exchange the code for an access token. Proof Key for Code Exchange (PKCE) has been adopted by many OAuth2 providers. With plain PKCE, a client app generates a random state value through the initial user agent call to the authorization server. The server saves this value. When the client app performs the code exchange, it sends the original state value along with the code, and the authorization server will not exchange the code for an access token unless the two state values match. The malicious actor must now observe both the initial state value and the access code to grab a token.
In a stronger form of PKCE, the client app sends a hash of the random state value when making the authorization request. During code exchange, it sends the original state value with the code. The authorization server compares a hash of this value with the original hash it received. Now, observing the original authorization request is no longer good enough; the hacker must intercept and modify the initial hash. If successful, the client app will no longer be able to exchange the token, but the attacker will.
PKCE is a good step, but using a client secret, which does not pass through the user agent, would be a safer approach, if it wasn’t so vulnerable when stored statically on a mobile device.
AppAuth for Android and iOS is a client SDK which works with OAuth2 and OpenID Connect (OIDC) providers. It wraps the raw protocol flows into each native platform’s familiar implementation style.
The SDK follows OAuth 2.0 for Native Apps best practices, including the PKCE extension and custom tab browsers. The library provides hooks to further extend the protocol beyond the basic flow.
As an open source project, AppAuth has GitHub repositories for Android and iOS which include good documentation, a demo app, and integration with multiple authorization services.
An app which searches and finds favorite books was developed on Android to further explore AppAuth SDK usage with a common application architecture and support libraries.
To follow along, start by cloning the Books demo project on GitHub available at github.com/approov. It requires some configuration, so it will not run out of the box. At a minimum, you will need to provide Google OAuth2 credentials which we will generate next.
The Books demo app uses a simple MVVM architecture with two activities for searching for books and finding favorites. The favorites activity is only enabled when logged in through the Google OAuth2 sign in service.
The AppAuth Android repository’s demo app shows off many of the AppAuth features, but it mixes UI, AppAuth, and network calls within activities. The Books app separates the AppAuth services into an independent model layer and integrates the authorization services with common libraries such as Retrofit2.
The full OAuth2 authorization code grant flow is separated into individual steps in the AuthRepo class. Long running functions are implemented with Async tasks off the main UI thread. The following sections highlight the major steps. Refer to the application code and the AppAuth libraries for additional detail.
The flow starts with Authorization Service and client configuration. OIDC adds a service discovery capability which looks up and configures the service API endpoints and other capabilities by using the oauth2.discoveryEndpoint specified in your local.properties file in the AuthRepo.initOauth2Flow() method.
Once the service discovery is finished and AppAuth is configured the authentication flow starts with invocation of AuthRepo.startUserAuth() that will start an AppAuth authorization request that will launch a browser to ask the user to present authorization credentials and grant permissions.
If authorization is successful, the app can access protected APIs using access tokens. The auth repo provides OKHTTP interceptors to wrap API calls with appropriate OAuth2 access tokens.
The AuthRepo.getAccessTokenInterceptor() wraps all API calls for the book's favorites with a bearer access token. The token is checked and refreshed if necessary before each call.
Immediately after a successful code exchange, the AuthRepo.onTokenRequestCompleted() function invokes the AuthRepo.finishCodeExchange() to gather user profile information from the Google sign in.
After you authorize the Books App the browser redirects the authorization server’s response back to the activity which notifies the AuthRepo.notifyUserAgentResponse() to continue.
If the redirect is successful, the AuthRepo.startCodeExchange() is invoked and attempts to exchange the authorization code for initial access and refresh tokens.
The AppAuth library provides an Auth state manager that, when used, frequently persists the authentication state into shared preferences. This state survives application restart so an application’s user authentication can persist between app sessions.
The Books app does not persist the state to demonstrate fresh configuration discovery and login each time the app starts. Persistence is a must-have feature in production, and the AppAuth class provides a solid starting point for a robust persistent mechanism.
The Books App will be using Google’s Books API to demonstrate using the AppAuth SDK to perform open and authorized searches on Android. The public portions of the API, such as open book search, don’t require an API key, but OAuth2 access tokens are required to access the private portions of the API, such as finding your favorite books.
To register for the OAuth2 credentials for Android, Google requires a public key SHA1 fingerprint, which is usually the fingerprint of the public key which signs your Android application package.
In a terminal, use the Java keytool to extract the fingerprint for your debug keystore.
keytool -list -alias androiddebugkey -storepass android -keystore ~/.android/debug.keystore -v | grep SHA1:
Next go to the Google developer’s console and sign in. Select or create a new project.
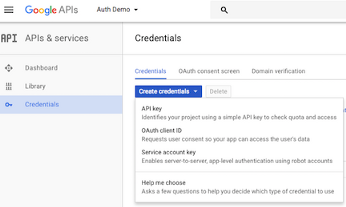
The project in this screen shot is shown as ‘Auth Demo’.
Now, create an OAuth2 client ID:
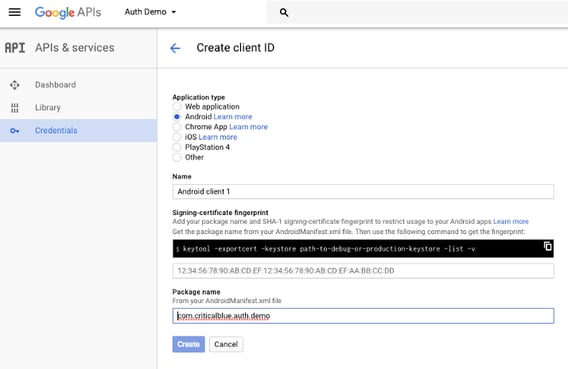
Next, copy and paste the Web Application OAuth2 Client ID to your local.properties file as per the /android/local.properties.example file:
oauth2.redirectScheme=com.criticalblue.auth.demo
oauth2.redirectPath=""
oauth2.redirectHost=""
oauth2.redirectUri=com.criticalblue.auth.demo:/oauth2redirect
oauth2.discoveryEndpoint=https://accounts.google.com/.well-known/openid-configuration

google.authorizationScope=openid email profile https://www.googleapis.com/auth/books
google.userInfoEndpoint=https://www.googleapis.com/oauth2/v3/userinfo
google.clientId=___YOUR_GOOGLE_CLIENT_ID_HERE___
The gradle build will insert this configuration information into your application as it is building. Remember that your local.properties is ignored by git, so neither of these values will be tracked by Git.
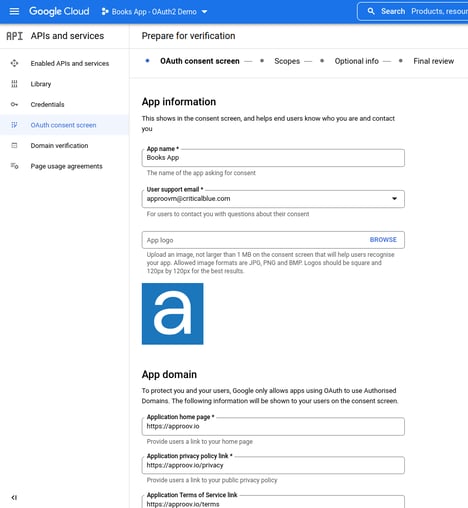
Finally, complete the OAuth2 consent screen:
Finally, go to Google API Libraries page and find and enable the Google Books API.
You should now be able to successfully build and try out the Books App.
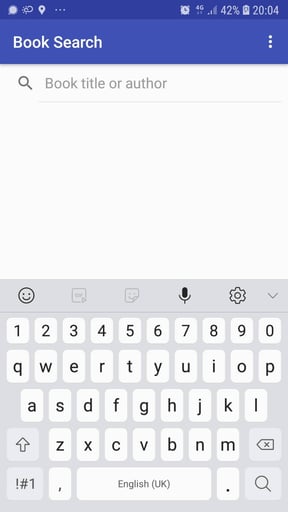
Below are a few screenshots of the Books app in action. The app launches with no login and an open book search dialog. Open book searches are done with no OAuth2 authorization required.
The next screen shows some search results.
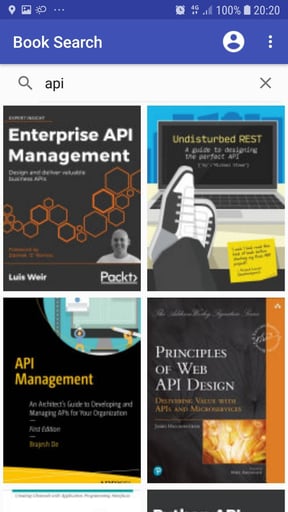
Note that the Favorites are not enabled because no user has logged in.
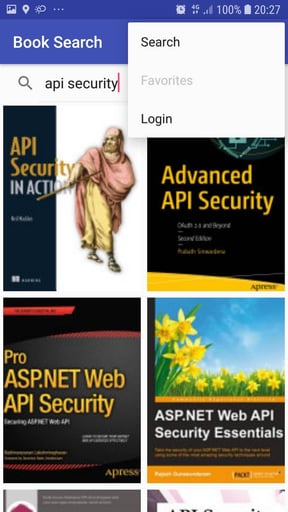
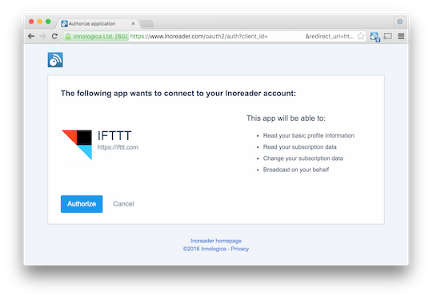
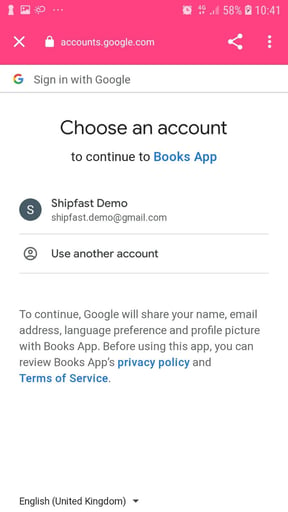
Picking the login menu item starts the sign in process, launching the custom tab browser.
When already logged in on the browser you are presented with a screen similar to this:
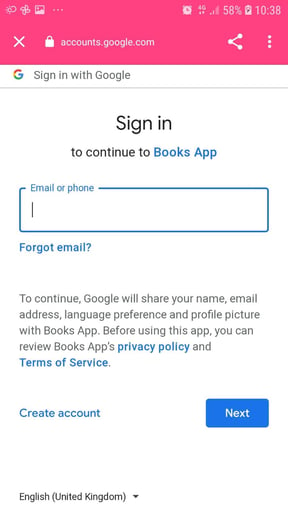
When not logged-in yet you should see a screen similar to this one:
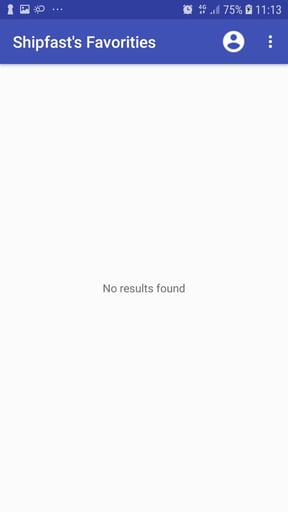
Upon successful authorization, the user icon displays on the top bar. You can now find the favorites of the authorized user.
If no favorites in the your bookshelf a screen similar to this will be presented:
You might not have any favorite books posted in your Google Books library. In a web browser, sign in to your Google account, go to books.google.com, and search for a topic, e.g. oauth2, and then click in one of the results, that will open in the book details page with a pop-up to preview the book content, that you need to close in the upper right corner to then be able to see and click in the button + Add to my library, and then select the favorites library.
After adding some books you can the re-visit your favorites library on the Books App to check them out:

Strictly speaking, read access to your Favorites bookshelf is public, meaning that anyone can access it. There is a catch however; you must first know your Google Books user ID, which is different from your common Google profile ID. To find your Books ID, you must query the API for a list of your bookshelves. This is an authenticated request, and the Google API identifies your Books user ID from your access token. You can parse the user ID out of a successful bookshelves response, and finally you can make an API request to get the books on your Favorites bookshelf using your access token.
The basic mobile flow, as demonstrated, uses a static client ID but no client secret during code exchange. Though PKCE is used, sign in security is not as robust as the best web client implementations where client ID and secret are used from within the application server.
A better solution would be to use the more secure OAuth2 web flow, without requiring the client secret to be hardcoded in the mobile app, by having instead a runtime secret securely delivered just-in-time of being used in the authorization code exchange request.
The follow-on article Strengthening OAuth2 for Mobile will show how this more robust OAuth2 web flow for mobile apps can be implemented in order to secure the OAUTH2/OIDC authorization code grant flow on mobile devices. This security enhancement is made possible through the use of a Mobile App Attestation service to attest the runtime environment and secure the API requests with managed trust roots that can be securely updated via an over-the-air configuration.
Subscribe to our monthly newsletter to get all the latest news in mobile security.
Schedule a live demo today!
- Senior Consultant at Approov
Developer and Evangelist - Software Performance and API Security - Linux and Android Client and Microservice Platforms