
Simon Rigg
Editor's note: This post was originally published in January 2018 and has been revamped and updated for accuracy and comprehensiveness. The latest update was in May 2021.
Welcome back! This is the second part of a mini series which uses a fictional product, “ShipFast”, to walk you through the process of defending against various API security exploits in a mobile application to gain access to data on a remote server allowing real users of the system to gain an unfair business advantage at the expense of the company.
In this post, I'll dive into a first attack scenario and look at how we can defend against it.
Full source code for the demo is available on github so that you can gain an understanding of the exploits and defences I’ll be demonstrating.
Enjoy! :-)
More often than not a mobile app uses an API key and a user authentication token to communicate with the API server. Thus it’s usual to see the API keys being shipped within the code to allow the mobile app to communicate with its own backend or to access Third-Party services, and a commonplace where we can look for those keys is in the app manifest, after all, Google Maps itself sets the example:

But it is just an API key, right? I mean, it is protected by user authentication so that is just fine, or isn’t it!!!
API keys are generally used to identify what is using the API and are often accompanied with a secret. They are a means for a server to perform a keyed lookup and proceed from there. The problem is, that in many cases these API keys are tied to services which are either free but rate-limited, or become associated with a cost depending on usage. So even if they are treated as "not hiding particularly sensitive data", they could be misused to gain unauthorized access to services and rack up an unexpected bill for somebody. Mental note to self: remove my Google Maps API key from this demo before committing!
We know the ShipFast app communicates with the ShipFast server to make API calls, so we will now intercept the network traffic using a Man in the Middle (MitM) proxy such as Charles proxy or the open-source mitmproxy that in through this attack example. If we request the nearest available shipment and look at the traffic through the MitM proxy, this is what we see:
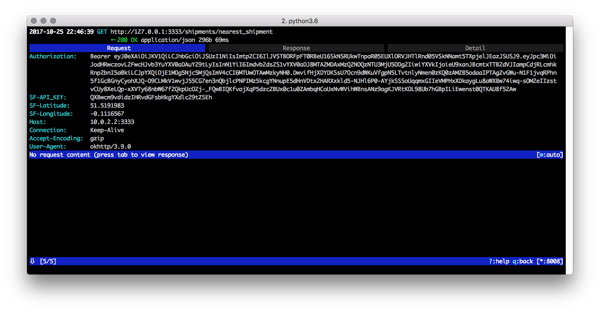 Wow! The authorization bearer token (from OIDC), nice. The ShipFast API key, great. Some location data and of course the actual URL for the API request. We can also take a peek at what comes back from the server:
 And now we have the basis of reverse engineering an API at runtime with a MitM attack, and to learn more about how to perform one you can read the blog post How to MitM Attack the API of an Android App. For reverse engineering a mobile app binary, you can read the article How to Extract an API Key from a Mobile App with Static Binary Analysis.
If we spend a little time analyzing API traffic and the contents of the ShipFast app we gain an understanding of how the private API works and thus use that information to our advantage. Note that this is a private API, as in, undocumented to the public. I would humbly suggest that there is no such thing. All APIs are vulnerable to reverse engineering and must be protected.
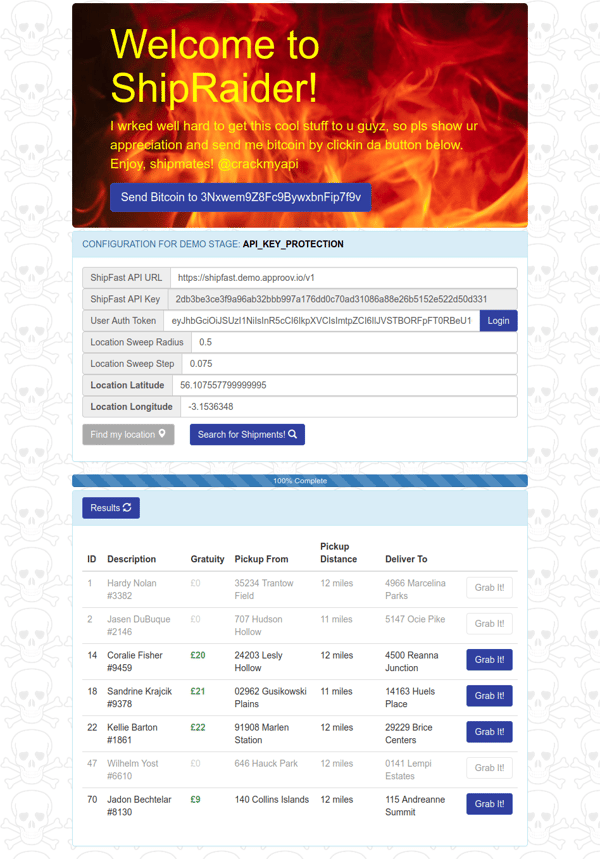
With our knowledge, we now build a rogue ShipFast 'app' named "ShipRaider" which is actually a simple web server using a combination of Node.js, bootstrap, jQuery and AJAX. Most of the logic runs client-side because we wish to minimize server resources and can therefore get the clients (browsers) to do the processing. The ShipRaider website is available at https://api-key.shipraider.demo.approov.io and is shown below:

For demonstration purposes, we show the various configuration data, but this could easily be cleaned up to make this rogue service very attractive to Shippers in search of an extra bonus.
As indicated by our MitM API analysis we are able to view user authorization bearer tokens and can therefore include them in ShipRaider, however, we have made the process even easier for Shippers by providing a "Login" button which uses the Auth0 service and configuration data we extracted by reverse engineering the ShipFast app such as the Auth0 Client ID and domain.
Recall that there is no way for Shippers to enumerate available shipments in the app: location data is provided internally and the ShipFast server gives out the nearest available shipment which may or may not have gratuity associated with it. The four location fields in ShipRaider allow Shippers to specify a location of their choosing as an origin point and a radius to 'sweep' over with a 'step' granularity. This is used to construct a virtual geographical area and fire authenticated API requests for nearest shipments at various points in this area in a brute-force fashion in order to drive out the list of shipments in the backend server via API scripting. The code which performs this task is located at ./server/shipraider-rogue-web/public/js/shipraider.js. In practice, we would probably need to use a more unpredictable method to avoid any server Web Application Firewall (WAF) behavioural analysis, but this is outside the scope of this walkthrough.
Let’s try out ShipRaider for this stage by visiting https://api-key.shipraider.demo.approov.io. For ShipRaider to be able to make requests to the ShipFast API server it needs to know the user authentication token, thus you need to click on the “login” button to enter it. If you are running the ShipFast app in a real mobile device you need to click on the button "Find my location" before you click the "Search for Shipments!" button, and if everything is set up correctly the rogue website will begin enumerating available shipments, for example:
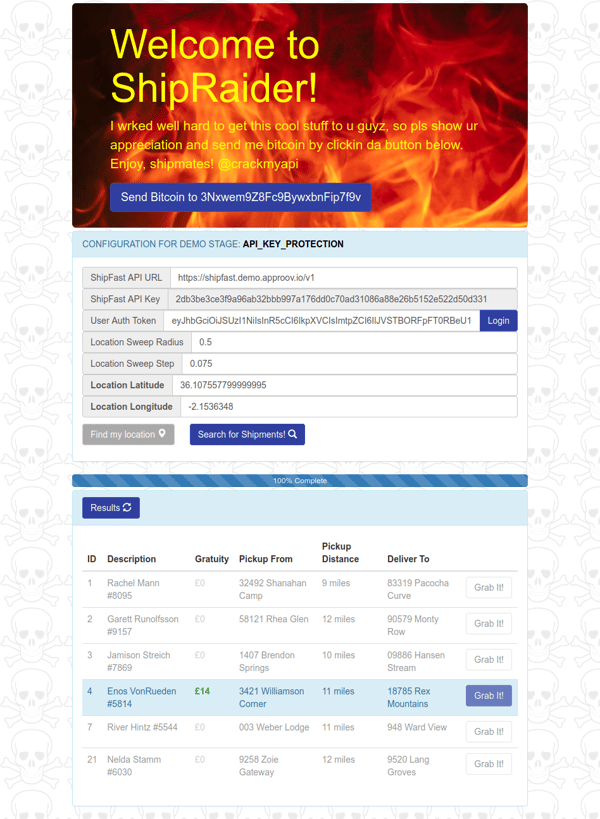
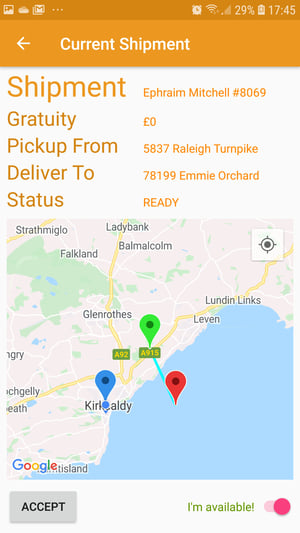
We can now choose the shipment with the highest gratuity (or any shipment for that matter) and click "Grab It!" which will perform an authenticated API request to modify the state of the shipment from "READY" to "ACCEPTED" as if we had clicked the "ACCEPT" button in the app. Afterwards, ShipRaider will highlight the "ACCEPTED" shipment in blue:
When we go back into the genuine ShipFast app and mark ourselves as available for the next shipment, the app first requests any pending shipment, and we will be presented with the shipment we grabbed using ShipRaider. Go ahead and try it out!
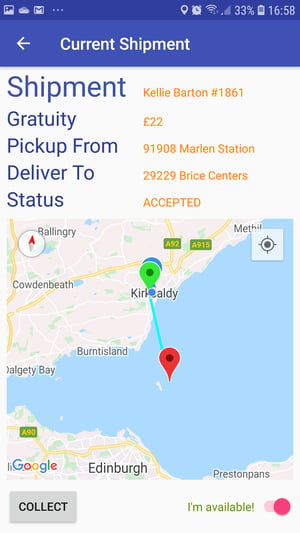
If you check the details for the shipment you will see that it matches the one you have selected in ShipRaider. If you proceed with collect and deliver the shipment you will see the list of delivered shipments which now includes both the Shipment marked as accepted in the ShipFast app and the one marked as accepted by clicking in the "Grab It!" button on the ShipRaider web interface:

Shippers are happy, ShipFast is not. A defence is needed urgently.
It is clear from the first attack that ShipFast must provide better protection of their API to ensure that only the genuine app is using it, and not a rogue alternative such as ShipRaider. Some API requests are from the app, others are from the rogue website. The only way to distinguish these is by the ShipFast API key, but that has already been stolen!
A simple strategy to avoid leakage of third-party API keys in the mobile app would be to, well, not include these API keys in the mobile app in the first place! They can be hoisted out of the app and instead stored on an intermediate server between the app and the ShipFast backend server, the intermediate server is, in fact, a Reverse Proxy. The app would then access the Reverse Proxy instead of the backend server through a single API key and unified API to reduce the attack surface. This strategy is covered in more detail in another tutorial at Hands On API Proxy which I recommend checking out.
Another strategy to avoid leakage of or tampering with sensitive data originating from the app which is visible through a MitM attack as demonstrated is to configure Transport Layer Security (TLS) certificate pinning to ensure the app knows it is talking to the correct server. In practice, this is often difficult to get right and there are various tools such as TrustKiller for Android and SSL Kill Switch for iOS which circumvent this protection. There is a great video explaining this in more detail which I recommend checking out:
Check the article Securing Https with Certificate Pinning on Android for a practical example on how a MitM attack can be done.
An initial improvement would be to move sensitive data into app code rather than the manifest. That will at least make it slightly harder for an attacker to find the data, and you can see in this repo the several techniques to hide secrets in an Android app.
A further improvement would be to bind the API requests to a particular client and ensure that modification of these requests through MitM attacks is detected, by digitally signing the API requests.
For the purposes of this walkthrough, we will focus on a different strategy of defence.
A common method used to digitally sign API requests involves using a Keyed-Hash Message Authentication Code (HMAC) which is designed to prevent hijacking and tampering.
We will generate a shared symmetric key for the HMAC, include it in the ShipFast app and server, and construct the message from the API request URL and user authentication bearer token. The result of this HMAC can be transmitted as part of API requests from the app and verified by the server.
For this stage, you need to install the APK for the static HMAC demo stage on your mobile device (no need to uninstall the previous one). Now launch the ShipFast app to see the initial screen with the static HMAC colour scheme (orange), and the mobile app should work as it did before:
Now if you now go back to ShipRaider web interface and edit the ShipFast url to point it to the ShipFast API version v2 (https://shipfast.demo.approov.io/v2) now used by the ShipFast app, you will see that ShipRaider no longer appears to work:

We will take a look at the changes made to the ShipFast API in more detail in order to understand why the ShipRaider requests are now being refused.
If we turn our attention to the ShipFast API server code, and in particular the new HMAC middleware we can observe what it needs to do in order to validate the client API requests by use of an HMAC.
First, we need an HMAC secret:
let base64_decoded_hmac_secret = Buffer.from(config.SHIPFAST_API_HMAC_SECRET, 'base64')
Second, we will use the secret to create a SHA256 HMAC and invoke the HMAC validation function:
  // Just use the static secret during HMAC verification for this demo stage
  let hmac = crypto.createHmac('sha256', base64_decoded_hmac_secret)


  if (hmacHelpers.isValidHmac(hmac, config, req)) {
    next()
    return
  }


  res.status(400).send()


  return
Third, we have a new API request header HMAC that we need to ensure is present in the request:
// Retrieve the ShipFast HMAC used to sign the API request from the request header
let requestShipFastHMAC = req.get('HMAC')

if (!requestShipFastHMAC) {
  log.error('\tShipFast HMAC not specified or in the wrong format')
  res.status(400).send()
  return
}
Finally, we can see how the HMAC secret and a message composed of the request URL and user authorization bearer token are used to validate the HMAC header:
  // Compute the request HMAC using the HMAC SHA-256 algorithm
  hmac.update(requestProtocol)
  hmac.update(req.hostname)
  hmac.update(req.originalUrl)
  hmac.update(req.get('Authorization'))
  let ourShipFastHMAC = hmac.digest('hex')


  // Check to see if our HMAC matches the one sent in the request header
  // and send an error response if it doesn't
  if (ourShipFastHMAC != requestShipFastHMAC) {
    log.error("\tShipFast HMAC invalid: received " + requestShipFastHMAC
      + " but should be " + ourShipFastHMAC)
    return false
  }


  log.success("\nValid HMAC.")


  return true
This NodeJS express middleware is added here to all our authenticated API requests:
// In v2 HMAC validation with a static secret replaces the API key to
//  authenticate WHAT is doing the request.
api.use('/v2', staticHmacMiddleware)
This means that before the API endpoint is processed, it will compare the HMAC header and return `false` if doesn’t match with the one calculated:
  // Check to see if our HMAC matches the one sent in the request header
  // and send an error response if it doesn't
  if (ourShipFastHMAC != requestShipFastHMAC) {
    log.error("\tShipFast HMAC invalid: received " + requestShipFastHMAC
      + " but should be " + ourShipFastHMAC)
    return false
  }

  log.success("\nValid HMAC.")

  return true
In my next post I will demonstrate an attack on this first defence as things start to get more sophisticated, and I'll also show how we can increase our defensive strategy and try to scupper those ShipRaiders... aarrrgh!
Thank you for reading and stay tuned!
Subscribe to our monthly newsletter to get all the latest news in mobile security.
Schedule a live demo today!